
HB Pre-S2 Antigen Quantitative ELISA Kit, Rapid
Product#: FNK-BCL-S2HP-01
$1,011.42
Availability:
Ships in 1-2 Weeks
HB Pre-S2 Antigen Quantitative ELISA Kit, Rapid
Cat. No.: FNK-BCL-S2HP-01
Size: 1kit
Storage: 4℃ (stable for at least 6 months)
Background
Three types of hepatitis B virus surface antigen, L-, M-, and S-proteins are known.
-The L-protein is composed of S, Pre-S2, and Pre-S1 domains.
-The M-protein is composed of S and Pre-S2 domains.
-The S-protein is composed of S domains.
-The M-protein is composed of S and Pre-S2 domains.
-The S-protein is composed of S domains.
Pre-S2 domain is known to play an important role in the development of HCC (hepato-cellular carcinoma) after HBV infection. The “HBs Pre-S2 Antigen Quantitative ELISA Kit, Rapid” provide a good tool to explore the mechanism of development of HCC as well as to detect HBV escape mutants by determining Pre-S2 antigen.
The principle and outline of assay
The key components of the kit are two types of anti-Pre-S2 antibody and the standard Pre-S antigen. So-called sandwich system is employed in this kit, where one type of antibody captures the antigen on the microplate surface, and the captured antigen is detected by another antibody labeled with HRP.
Finally the amount of HRP attached was determined using chromogenic substrate. There are two methods to detect Pre-S2 antigen using the kit, and the approximate times required are as follows;
1-Step method: Total assay time = 90 min1)
①reaction with capture and detection IgGs(60) → ②chromogenic reaction(30)
2-Step method2): Total assay time = 150 min
①reaction with capture IgG(60) → ②reaction with detection IgG(60) → ③chromogenic reaction(30)
1): The indicated time does not include times for sample preparation, plate washing, abs measurement etc.
2): This method is recommended to use when one does not want to dilute samples such as due to low antigen concentration. Signal intensity and detection limit do not differ between the two methods.
The definition of Pre-S2 antigen activity
There is no established definition to express Pre-S2 antigen activity. In the kit we expressed the Pre-S2 antigen activity as follows; the Pre-S2 activity of 1 nUnit equals to that of 1 ng of standard antigen that
is provided in the kit.
Storage condition and stability
All components can be stored at 4℃. At the condition, all reagents are stable for at least 6 months after shipment.
Materials and Reagents
Kit composition
The kit contains following materials. Please ensure that all materials are provided in the kit.
- Anti Pre-S2 Detection IgG (HRP-labeled): 18 μL (1 tube)
- Standard Pre-S antigen (lyophilized form, recombinant antigen): 10 μg (1 tube)
- Buffer A, 20 x conc.: 20mL (1 bottle)
- Reaction Buffer, 3 x conc.: 20 mL (1 bottle)
- Dilution Solution For Detection IgG: 6 mL(1 bottle, red colored)
- Chromogenic Reagent A: 6 mL (1 light shielded bottle)
- Chromogenic Reagent B: 6 mL (1 bottle)
- Stop Solution: 6.5 mL (1 bottle)
- Assay Plate For Pre-S2 antigen: 1 plate (pre-coated with anti-Pre-S2 antigen antibody)
- User’s manual
- Microplate reader (equipped to measure absorbance at 492 nm)
- Micropipettes (for the handling of standard antigen and samples)
- Microtubes (for the handling of standard antigen and samples)
- Plate sealers (or plastic films)
- Multi (8-) channel pipette and its reservoir
- Distilled water or pure water
<Preparation before starting>
- Buffer A: Warm up Buffer A bottle to room temperature for complete dissolution (chilled concentrated buffer often contains depositions of salts), and dilute the content to 20-fold with distilled or pure water. This makes 400 mL of Buffer A ready to use.
- Reaction Buffer: Warm up Reaction Buffer bottle to room temperature for complete dissolution, and dilute the content to 3-fold with distilled or pure water. This makes 60 mL of Reaction Buffer.
- Standard antigen: Pour 1 mL of 1 x Buffer A into the standard antigen tube and invert it several times for complete dissolving. This makes 10 μUnit/mL(10 μg/mL)antigen solution.
- Detection Antibody Solution: Take 0.5 mL of red colored solution from the bottle of Dilution Solution for Detection IgG, and pour it into the tube of Detection IgG and invert it several times for complete antibody dilution. Return all the diluted antibody solution to the bottle and mix the content thoroughly. Repeat same procedure in order to achieve complete transfer of Detection IgG to the bottle. This makes 6 mL of Detection IgG solution.
1-Step Method
<①Preparation of standard solutions>
1. Transfer 900 μL of Reaction Buffer into a microtube, and add 100 μL of standard solution (10 μUnit/mL) prepared above and mix well using a vortex mixer. The final concentration of the standard solution is 1000 nUnit/mL. Likewise, prepare the series of standard solutions as indicated in below table. Make it sure that you use the right dilution buffer, i.e Reaction Buffer.
2. To draw the standard curve, standard solution from STD① to STD⑦ are used.
2. To draw the standard curve, standard solution from STD① to STD⑦ are used.
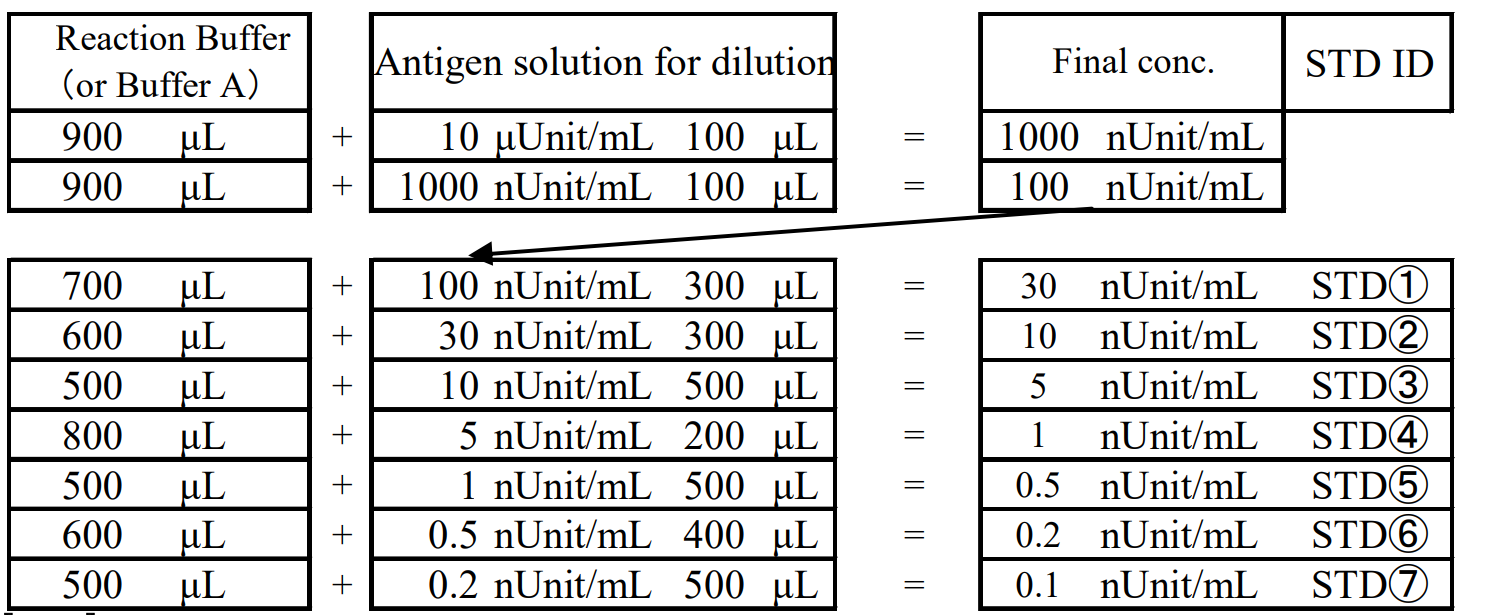
As the dilution buffer, use Reaction Buffer for 1-Step Method and Buffer A for 2-Step Method.
<②Preparation of sample solutions>
1. Dilute the sample solution by Reaction Buffer so that the expected activity is within the measurable range (0.1~30 nUnit/mL). Sample should be diluted more than 10-fold by Reaction Buffer for accurate measurement.
2. When Pre-S2 antigen activity of a sample can not be estimated, please prepare multiple samples with different dilution factors.
3. Human serum sample should be diluted to more than 100-fold with Reaction Buffer to prevent the effect of serum components. Refer to below [note] to save Reaction Buffer.
2. When Pre-S2 antigen activity of a sample can not be estimated, please prepare multiple samples with different dilution factors.
3. Human serum sample should be diluted to more than 100-fold with Reaction Buffer to prevent the effect of serum components. Refer to below [note] to save Reaction Buffer.
[note] 1. Measurement of highly contaminated samples may not give accurate measurement. It is recommended to ensure the accuracy by using samples which is added by known amount of standard antigen.
2. The total volume of Reaction Buffer is 60 mL. When a sample has to be diluted over 10-fold, use Buffer A for initial dilution steps. Reaction Buffer should be used at the final dilution step to reduce consumption.
<③Reaction of antigen with capture IgG and detection IgG >
1. Take the assay plate out of the aluminum package.
2. In triplicate manner, add 100 μL of sample, standard solutions and Reaction Buffer (as the blank) to each well.
3. Pour diluted Detection IgG (prepared in “Preparation before starting”) into reservoir, and by using 8-channel multi pipette add 50 μL of the IgG solution into each well.
4. Cover the plate by plate sealer, and let it stay at room temperature (around 25°C) for 1 hr.
2. In triplicate manner, add 100 μL of sample, standard solutions and Reaction Buffer (as the blank) to each well.
3. Pour diluted Detection IgG (prepared in “Preparation before starting”) into reservoir, and by using 8-channel multi pipette add 50 μL of the IgG solution into each well.
4. Cover the plate by plate sealer, and let it stay at room temperature (around 25°C) for 1 hr.
(go to “④Preparation of Chromogenic solution” for next step)
2-Step Method
<①Preparation of standard solutions>
1. Put 900 μL of Buffer A into a tube, add 100 μL of standard solution (10 μUnit/mL) prepared above and mix well using a vortex mixer. The final concentration of the standard solution is 1000 nUnit/mL. Likewise, prepare the series of standard solutions as indicated in the above table. Make it sure that you use the right dilution buffer, i.e Buffer A.
2. To draw the standard curve, standard solution from STD① to STD⑦ are used.
2. To draw the standard curve, standard solution from STD① to STD⑦ are used.
<②Preparation of sample solutions>
1. Dilute the sample solution by Buffer A so that the expected activity is within the measurable range (0.1~30 nUnit/mL).
2. When human serum is assayed, serum sample should be diluted more than 100-fold by Buffer A to prevent the effect of serum components.
3. Sample can be directly applied without any dilution if the condition of sample is similar to PBS (PBS, pH 7.4) or suitable for antigen-antibody interaction.
2. When human serum is assayed, serum sample should be diluted more than 100-fold by Buffer A to prevent the effect of serum components.
3. Sample can be directly applied without any dilution if the condition of sample is similar to PBS (PBS, pH 7.4) or suitable for antigen-antibody interaction.
[note] 1. Measurement of highly contaminated samples may not give accurate measurement. If you measure such samples, it is recommended to ensure the accuracy by using samples which is added by known amount of standard antigen.
2. Use PBS-T (PBS+0.05% Tween-20) when Buffer A is not enough for sample dilution.
<③ 2-Step reaction of antigen with capture IgG and detection IgG >
1. Take the assay plate out of the aluminum package.
2. In triplicate manner, add 100 μL of sample, standard solutions and Buffer A (as the blank) to each well. Incubate at room temperature (around 25°C) for 1 hr.
3. For preparation of Detection Antibody solution, transfer 12 mL of Reaction Buffer into a reservoir,and add all (6 mL) of red colored diluted Detection IgG (prepared in “Preparation before starting”) into it and mix well.
4. At the end of the reaction of sample with capture IgG, remove solution from the assay plate by decantation followed by gentle tapping on the paper towel.
5. Wash each well with 300 μL/well of Buffer A three times and remove residual solution by gentle tapping on the paper towel.
6. Add 150 μL of the just prepared diluted Detection IgG into each well by using 8-channel multi pipette.
7. Cover the plate by plate sealer, and incubate at room temperature (around 25°C) for 1 hr.
2. In triplicate manner, add 100 μL of sample, standard solutions and Buffer A (as the blank) to each well. Incubate at room temperature (around 25°C) for 1 hr.
3. For preparation of Detection Antibody solution, transfer 12 mL of Reaction Buffer into a reservoir,and add all (6 mL) of red colored diluted Detection IgG (prepared in “Preparation before starting”) into it and mix well.
4. At the end of the reaction of sample with capture IgG, remove solution from the assay plate by decantation followed by gentle tapping on the paper towel.
5. Wash each well with 300 μL/well of Buffer A three times and remove residual solution by gentle tapping on the paper towel.
6. Add 150 μL of the just prepared diluted Detection IgG into each well by using 8-channel multi pipette.
7. Cover the plate by plate sealer, and incubate at room temperature (around 25°C) for 1 hr.
(go to “④Preparation of Chromogenic solution” for next step)
Common to both methods
<④Preparation of Chromogenic solution>
1. About a few min before the end of reaction, prepare chromogenic reaction mixture as follows.
2. Transfer all the solutions from Chromogenic Regent A and B bottles into a reservoir, and mix well.
2. Transfer all the solutions from Chromogenic Regent A and B bottles into a reservoir, and mix well.
[note] 1.To get the best result, we recommend to pre-warm the Chromogenic Regent bottles to room temperature before mixing.
2. The prepared chromogenic solution decreases the activity by oxidation within fairly short time. So please use the solution within 15 min after preparation.
<⑤Chromogenic reaction>
1. At the end of antibody reaction, remove the reaction solution from each well by decantation followed by gentle tapping on the paper towel.
2. Wash each well with 300 μL/well of Buffer A five times and remove residual solution by gentle tapping on the paper towel.
3. Add 100 μL of the mixed chromogenic solution to each well by using an 8-channel pipette, and incubate for 30 min at room temperature in a light shielded container. To obtain reproducible result the incubation time with chromogenic solution should be accurately 30 min.
4. Stop the reaction by adding 50 μL/well of stop solution.
[note] The orange color generated by the chromogenic reaction changes rather quickly. Thus, to obtain accurate determinations, it is important to measure the absorbance soon after the addition of stop solution2. Wash each well with 300 μL/well of Buffer A five times and remove residual solution by gentle tapping on the paper towel.
3. Add 100 μL of the mixed chromogenic solution to each well by using an 8-channel pipette, and incubate for 30 min at room temperature in a light shielded container. To obtain reproducible result the incubation time with chromogenic solution should be accurately 30 min.
4. Stop the reaction by adding 50 μL/well of stop solution.
<⑥Absorbance measurement and calculation>
1. Measure the absorbance at 450 nm of each well by using a plate reader.
2. Calculate the specific absorbance of each sample or standard by subtracting the blank value.
3. Calculate the best fit curve between the specific absorbance values and the corresponding standard concentrations using 4 parameters logistic model.
4. The concentration of samples can be calculated from the equation of the best fit curve.
5. The calculated concentrations which are out of the range (<0.1 or >30 nUnit/mL) are not reliable.
2. Calculate the specific absorbance of each sample or standard by subtracting the blank value.
3. Calculate the best fit curve between the specific absorbance values and the corresponding standard concentrations using 4 parameters logistic model.
4. The concentration of samples can be calculated from the equation of the best fit curve.
5. The calculated concentrations which are out of the range (<0.1 or >30 nUnit/mL) are not reliable.
[note] Clean up the bottom of the plate before absorbance measurement to avoid inaccurate determination.
Example of standard curve
Below is an example of measurements of standard solutions and resulting standard curve.
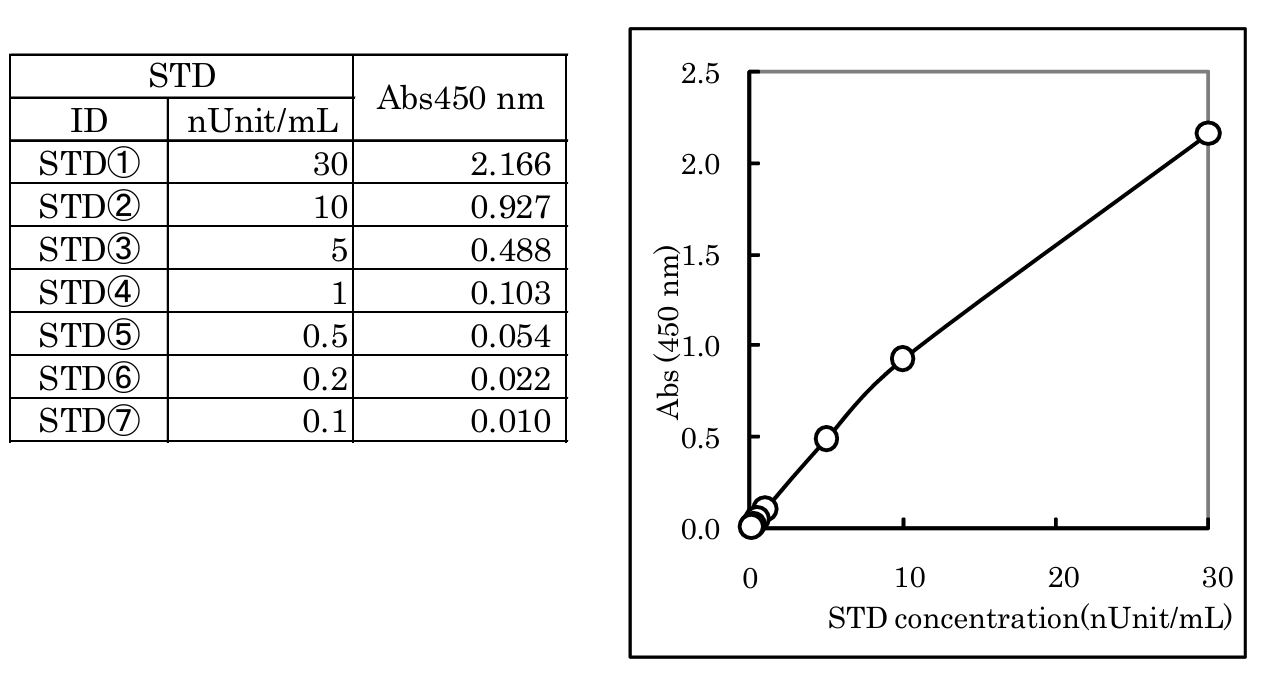
[note] The above data is an example, and does not guarantee the performance of the kit. The results may differ due to the difference of the technique and other conditions.